This tutorial helps you to create and design your own 3D text in photoshop. You can apply this photoshop effect to your website and any other place where you design your web. Some of the Photoshop tutorial may hard and some of then are too easy. But, this tutorial may easy to you. Because, I create this with step by step image tutorial.
Let's start from new document. Customize the options, how big image you want or small image.
 Choose the text option what you like. I'm using Arial and size 200px. And here comes the text result.
Now, we have to bend the text to make look as 3D. For that, Layer > Type > Convert to shape. Also, Edit > Transform path > Perspective.
And make a text bend as below. Take your courser to the top right corner and take it down.
 For the easy, you can use Edit > Transform > Skew.
Now hold CTRL + ALT and Up Arrow. You will see the duplicate layer move up by one pixel. Do this step about 15 or similar. You will see something like this,
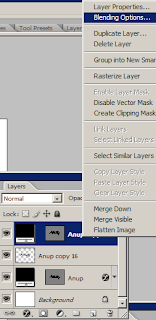
 Now, you have to join the duplicate layers together. But, don't join to top layer. To do this, select from the second layer from the top and link all layers to underneath. Also you can select from second to second last layers.
 Now, Go to Layer > Merge Visible. And you will see something like this:
 Now, apply the layer styles to the bottom layer, as you can see Background on above image (Double click bottom layer to active it). Go to Layer > layer styles, Gradient Overlay, Bevel and Emboss, Drop Shadow (apply all these three effects).
For easy, apply the option like below, (click the link)
Gradient Overlay
Bevel and Emboss
Drop Shadow
Now, you look like this:
 Now, again apply the layer styles on the top layers,

Click the links and follow the image,
Inner shadow
Bevel and Emboss
Gradient Overlay
Pattern Overlay
Or, you can use your own colors and choose your own option you link.
And finally, your text looks like this:
 Now, you have done your work :) So, how do you like this tutorial? You can show me your work via comment and any image. Any you can ask where you confused.
You can Download my PSD work here.
Let's start from new document. Customize the options, how big image you want or small image.

Now, we have to bend the text to make look as 3D. For that, Layer > Type > Convert to shape. Also, Edit > Transform path > Perspective.
And make a text bend as below. Take your courser to the top right corner and take it down.

Now hold CTRL + ALT and Up Arrow. You will see the duplicate layer move up by one pixel. Do this step about 15 or similar. You will see something like this,


For easy, apply the option like below, (click the link)
Gradient Overlay
Bevel and Emboss
Drop Shadow
Now, you look like this:


Click the links and follow the image,
Inner shadow
Bevel and Emboss
Gradient Overlay
Pattern Overlay
Or, you can use your own colors and choose your own option you link.
And finally, your text looks like this:

You can Download my PSD work here.
